
Recommended recibes by our top chef’s
Breakfasts
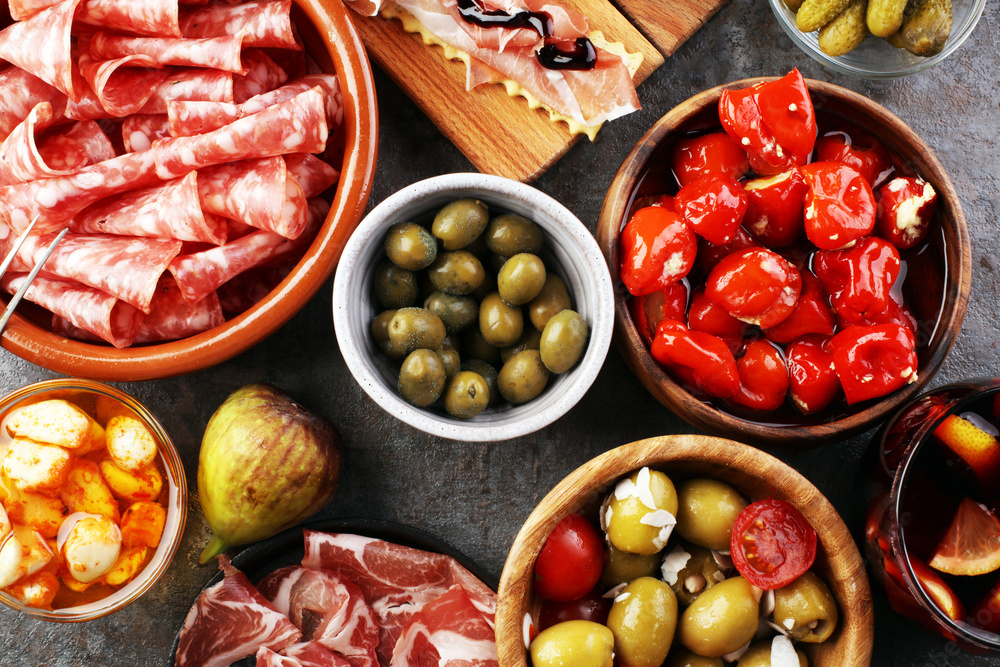
Tapas, Sides and Small Plates
Soups and Stews
Appetiser and Mezze
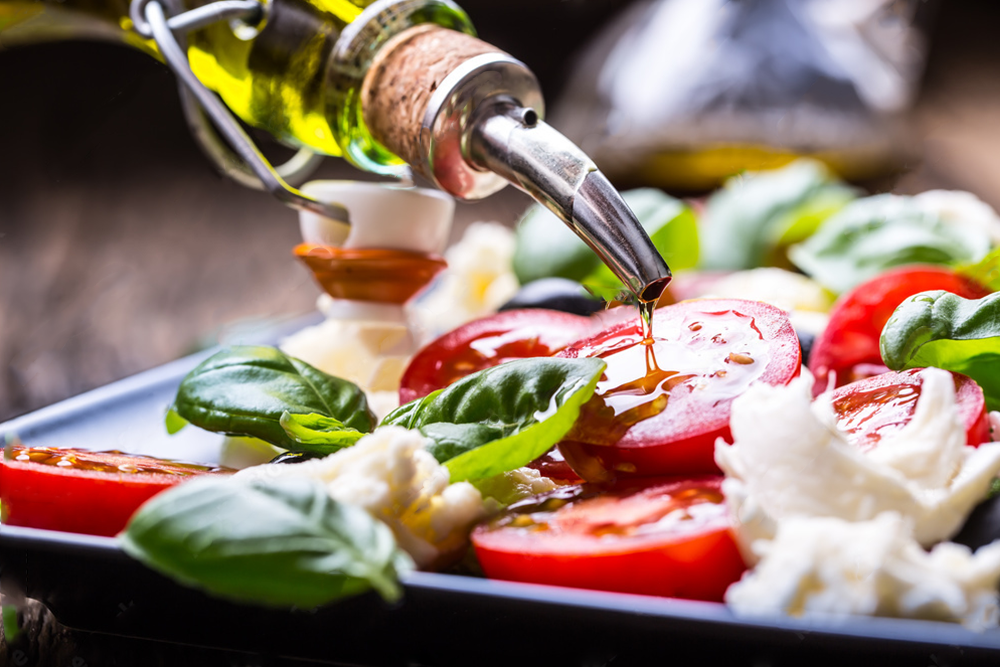
Salads
Entree
Desserts
Breads
Drinks


Smoked Salmon Platter

Smoked Salmon Platter
Use this recipe as a guide to make an amazing salmon platter like a pro! If you're serving more than 6 people, you can double or triple the amounts used here. And don't be shy to make this platter your own by using what vegetables you have on hand or adding more of your favorite marinated items…
Servings: 6 People
Calories: 197.9kcal
Ingredients
- 4 eggs soft boiled
- Kosher salt
- Red pepper flakes or Aleppo pepper
- 12 oz smoked salmon
- 4 oz Cream cheese or Labneh
- 3 oz Feta cheese sliced into slabs
- 1 English cucumber thinly sliced into rounds
- 1 bell pepper (any color) thinly sliced into rounds
- 1 vine-ripe tomato thinly sliced into rounds
- 5 5 radishes thinly sliced into rounds
- ¼ cup assorted olives
- ⅓ cup marinated artichoke hearts
- 1 small red onion thinly sliced into rounds
- 1 Lemon cut into wedges
Instructions
- Boil the eggs. Bring a saucepan of water to a boil over medium-high heat (make sure the saucepan can hold all the eggs in one single layer). Using a spoon, very gently lower the eggs in the boiling water large. Cook for exactly 6½ minutes, adjusting the heat as necessary to maintain a gentle boil. When the eggs are ready, transfer them to a large bowl of iced water and let them sit for about 2 minutes. Peel the eggs and cut them in halves and season with kosher salt and a pinch of red pepper flakes or Aleppo pepper (which is milder and has a slightly sweeter finish)
- To assemble the salmon platter, place a small bowl of cream cheese or labneh in one third of the the platter. Place the feta cheese in another corner of the platter. Arrange the salmon, cucumbers, bell peppers, tomatoes, radish, onions, olives, artichoke hearts and lemon wedges around the cheese. Sprinkle a little more red pepper flakes or Aleppo pepper.
- Serve with your favorite crackers, crostini, bagels, pita wedges or even pita chips!
Notes
Za’atar Manaqish
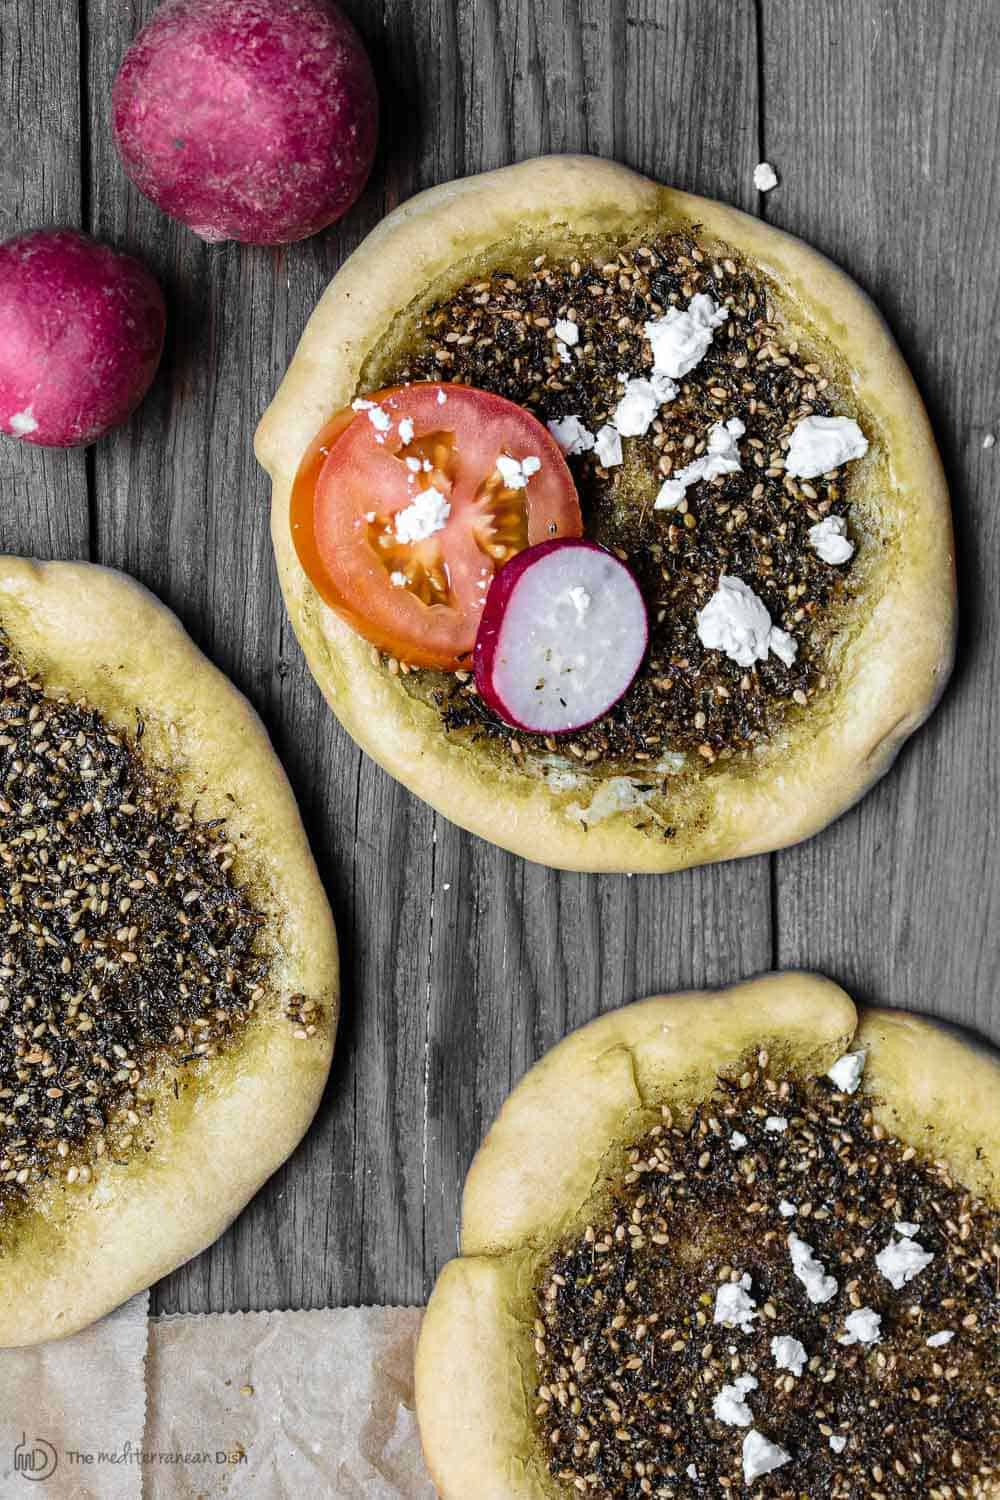
Za’atar Manaqish
Manaqish or manakish are savory pastries popular in the Levant (Eastern Mediterranean) region. My mother in law, a master of the Levant kitchen, was the one who first introduced me to the making of za'atar manaqish. They are the perfect make-ahead snack, appetizer, or even brunch!
Servings: 8 people
Ingredients
For Dough
- 1 cup lukewarm water
- ½ tsp sugar
- 2¼ cup active dry yeast (one package active dry yeast)
- 3 cup unbleached all-purpose flour more for dusting
- 1 tsp salt
- 2 tsp extra virgin olive oil
For Za'atar Topping
- 7-8 tsp quality za'atar spice
- ½ cup extra virgin olive oil
Serve with
- Fresh garden vegetables (tomato, cucumbers, radish)
- Olives
- Homemade labneh or feta cheese omit if vegan
Instructions
- In a small bowl, combine water, sugar and yeast. Set aside for 10 minutes to foam.
For the Dough
- Turn dough onto a lightly floured surface and knead for 10 minutes or until dough is elastic, smooth, and no longer sticky (as you knead, if dough is too sticky for you, you can sprinkle just a tiny bit of flour to help it).
- Form dough into a ball and place in a lightly oiled mixing bowl. Cover with damp cloth and place in a warm spot (inside a warmed but turned-off oven is a good place). Leave to rise for 1 hour and 30 minutes.
- Punch dough down. Knead briefly and form into 8 small balls. Arrange on lightly floured surface, cover again and leave to rise another 30 minutes.
Prepare the za'atar topping
- While dough is rising, mix together the za'atar spice and olive oil in a bowl.
- Preheat the oven to 400 degrees F. Place a large baking sheet in oven while heating.
Form za'atar manaqish.
- Lightly oil the heated baking sheet and set near you. Flatten the dough into small discs about 5 inches in diameter. With your finger tips, make indentations in discs and add about 1 tablespoon za'atar topping in the middle of each disc, leave a narrow boarder around. Arrange discs in prepared oiled baking sheet (use two sheets if needed, do not crowd the manaqish).
- Bake in 400 degrees F heated-oven for 7 to 8 minutes or until the dough is slightly browned on bottom and edges (za'atar topping will remain liquidy at this point). Remove from heat and let sit for 5 minutes or so, the topping will dry and settle into dough.
- Serve za'atar manaqish warm or at room temprature with assorted vegetables, olives, feta cheese, or homemade labneh
Notes
- To serve as mezze simply portion the dough into smaller balls, form smaller discs about 3 inches in diameter instead. You should be able to make 12 or more manaqish. When you bake them, watch the oven closely as they will bake quicker.
- Make-ahead instructions You can make these a week or two ahead and simply freeze them in freezer bags (I like to double the freezer bags to prevent freezer burns). Take as many of the manaqish as you need out to thaw at room temperature or in the fridge overnight. Warm in low-temperature oven. If you don’t remember to take them out in advance, you can always simply heat in the oven from frozen.
Eggs Fra Diavolo

Eggs Fra Diavolo
These saucy eggs are my twist on eggs in purgatory, and they are perfect for brunch or dinner. Start with hardboiled eggs and give them a quick sautee in extra virgin olive oil until the whites are crispy and golden brown, then dunk the eggs in the delicious spicy tomato sauce! If you would rather make a more classic eggs in purgatory, see the notes for the option to poach your eggs directly in the sauce.
Servings: 6 prople
Ingredients
- 6 Hardboiled eggs Peeled
For The Spicy Tomato Sauce
- 1 Medium onion Yellow or red, chopped
- 5 Garlic cloves Minced
- 1 Hot pepper such as jalapeño Such as jalapeño, chopped
- Salt Kosher
- 15 Ounce Can tomatoes Can diced fire-roasted tomatoes
- ¼ Cup tomato paste
- 2 teaspoons Oregano Dried
- 1 to 2 teaspoons Dried red pepper Flakes or Aleppo pepper, more or less to your liking (if you like the sauce hot, you can add more)
- ½ Cup basil or parsley Chopped
Instructions
- In a 10-inch skillet or pan, heat about 2 tablespoons extra virgin olive oil over medium-high heat until shimmering. Carefully add the already boiled eggs and cook on all sides until the egg whites begin to crisp up and turn golden brown (use a splatter guard over your pan to keep the oil from splashing). Remove the eggs from the pan and set them on a plate or bowl for now.
- In the same pan, add the onions, garlic, and jalapeno. Cook for 3 to 5 minutes, tossing regularly, until fragrant. Season with a big dash of kosher salt.
- Add the diced tomatoes, tomato paste, and about ¼ cup of water. Season with another big dash of kosher salt. Add the oregano and red pepper flakes, if using. Bring the mixture to a boil, then lower the heat to medium-low and allow the tomatoes to simmer for about 10 minutes or so.
- Add the eggs to the simmering tomato sauce and cook for another 3 minutes or until the eggs are warm.
- Remove from the heat and finish with the parsley and a good drizzle of extra virgin olive oil. Serve with crusty bread or warmed flatbread.
Notes
For classic eggs in purgatory:
To make this recipe the classic way, skip the boiled eggs. First, make the spicy tomato sauce, then crack 6 raw eggs and nestle them in the sauce. Allow the sauce to simmer some more until the egg whites have set while the yolks remain creamy and somewhat runny. This is similar to how to make shakshuka. The sauce is a variation based on this fra diavolo recipe:
In today’s recipe, I omitted the white wine and added fresh chiles. Leftovers:
store leftovers in a tightly closed glass container in the fridge for up to 3 days. You can warm them up over medium heat, just add a little water if the sauce is too dry.
Smoked salmon sandwich with feta

Smoked salmon sandwich with feta
Think of this open-faced smoked salmon sandwich as a lighter Mediterranean twist on classic lox and bagels, except lighter and maybe even bolder with flavor, thanks to feta and a delicious crunchy root veggie salad! To make it spreadable, don't forget to smash the feta with some olive oil to schemer on the salmon toasts.
Servings: 4 people
Ingredients
- 1 Carrot peeled and cut into thin, short sticks
- 1 Radishes cut into thin, short sticks
- 1 Green onion, white and green parts, sliced into rounds
- 1 Aleppo pepper (or red pepper flakes), to taste
- Kosher salt To taste
- 1 Lime or lemon
- Olive oil Extra virgin
- 1 Small beet peeled and cut into thin, short sticks
- 4 Slices whole wheat bread, toasted
- 2 Ounces Quality feta cheese
- 5 to 6 Ounces Quality smoked salmon fillet
Instructions
- In a small bowl, combine the carrots, radish, green onion, and beets. Season lightly with kosher salt and Aleppo pepper (or red pepper flakes). Add as good squeeze of the lime and a drizzle of extra virgin olive oil and toss.
- Combine the feta cheese with a bit of olive oil and, using the back of your fork, break up the feta and mash it so it is easy to spread.
- Spread some feta on each of the toasted bread slices. Add the smoked salmon on top and season with a pinch of red pepper flakes and a squeeze of lime, if you like. Add the veggies on top and serve!
Notes
Cheese options:
I used feta, made softer with a bit of extra virgin olive oil. Other cheese options like labneh, whipped feta, goat cheese, or another soft cheese will work well. Choosing your smoked salmon:
smoked salmon is already cooked and ready to use, and you can find it in the refrigerator section near the fish counter at most grocery stores. Do examine the package well, and avoid smoked salmon that looks too oily or has brown spots or dark dry edges. Read the label as well to make sure it does not have too much salt or sugar. Serving ideas:
these toasts are great for brunch or lunch next to salad. If you’re making a big lunch buffet for friends, you can add an egg dish like my herby potato omelet, frittata, or egg casserole. Leftovers and storage:
Store leftover vegetables in an airtight container in the fridge for up to 3 days. Smoked salmon leftovers that have not been combined with other ingredients can be stored in their packaging for up to 1 week in the refrigerator (read your package instructions).
Healthy Breakfast Egg Muffins

Healthy Breakfast Egg Muffins
Easy and healthy breakfast egg muffins. These low-crab, freezer friendly egg muffins make a great breakfast on the go! Also perfect for your next brunch, serve along with salad and other Mediterranean favorites (see notes for ideas!)
Ingredients
- Extra virgin olive oil for brushing
- 1 Small red bell pepper, chopped
- 12 Cherry tomatoes, halved
- 1 Shallot finely chopped
- 6 to 10 Pitted kalamata olives chopped
- 113 g Cooked chicken or turkey boneless, shredded
- 28. 34 g Fresh parsley leaves chopped
- Handful crumbled feta
- 8 Large eggs
- Salt and Pepper
- ½ tsp Spanish paprika
- ¼ tsp ground turmeric
Instructions
- Place a rack in the center of your oven and preheat to 350 degrees F.
- Prepare a 12-cup muffin pan like this one (or 12 individual muffin cups). Brush with extra virgin olive oil.
- Divide the peppers, tomatoes, shallots, olives, chicken (or turkey), parsley, and crumbled feta among the 12 cups (they should come up to about ⅔ of the way full.)
- In a large measuring cup or a mixing bowl, add eggs, salt, pepper, and spices. Whisk well to combine
- Pour the egg mixture carefully over each cup, leaving a little room at the top (should be about ¾ of the way or so.)
- Place muffin pan or muffin cups on top of a sheet pan (to help catch any spills). Bake in heated oven for about 25 minutes or until the egg muffins are set.
- Let cool for a few minutes, then run a small butter knife around the edges of each muffin to loosen. Remove from pan and serve!
Breakfast open faced sandwich, italian-style

Breakfast open faced sandwich, italian-style
This open faced sandwich is a simple breakfast toast with the flavors of Italy! So easy to prepare, and every bit as satisfying!
Servings: 4 people
Ingredients
- 1 cup Part-skim ricotta cheese
- 2 tbsp Olive oil Extra virgin
- ½ tsp Dried oregano
- Salt and pepper
- 4 Slices hearty Italian bread Toasted
- 4-8 Fresh basil leaves
- 1 Roma tomato Sliced
- 3 3 radishes Thinly sliced
- 2 tbsp Roasted red pepper in oil, drained in oil, and drained
- 4 Prosciutto slices (or your favorite Italian cured meat)
- 4 Eggs Poached
- 1 tbsp Shelled pistachios Crushed
Instructions
- Place the ricotta cheese in a small mixing bowl. Add the olive oil, dried oregano, salt and pepper. Whip with a fork.
- Spread the whipped ricotta cheese on the toasted Italian bread. Top with the remaining ingredients in the order listed (the poached eggs and a garnish of shelled pistachios are added at the very end). Enjoy!
Middle Eastern Zucchini Baked Omelet (Eggah Bi Kousa)

Middle Eastern Zucchini Baked Omelet (Eggah Bi Kousa)
A baked omelet made Middle Eastern style with zucchini, onions and lots of fresh mint leaves. Comes together in 30 mins or less. The perfect breakfast or brunch, especially with a side of fattoush or tabouli salad!
Servings: 6 people
Ingredients
- 2 Zucchini, thinly sliced into rounds
- Salt
- 2 tbsp Olive oil, More if needed
- 1 Small onion thinly sliced
- ½ tsp Garlic powder
- Whole bunch fresh mint leaves stems removed (about 30 mint leaves), torn
- 8 Large eggs
- pinch red pepper flakes
- ½ tsp Baking powder
- 2 2 slices of bread (toast), crust removed and soaked in ⅓ cup milk crust removed and soaked in ⅓ cup milk
- Feta cheese for garnish (optional)
- Lemon juice to serve to serve
- Sliced tomatoes to serve (optional) (optional)
Instructions
- Preheat the oven to 350 degrees F.
- Sprinkle the zucchini slices with a little salt and set aside for 15 minutes. Pat the zucchini dry.
- In a 10-inch cast iron skillet (or oven safe skillet), heat the olive oil on medium, then add the zucchini and onions. Raise the heat to medium-high and saute the vegetables for 5-7 minutes or until they are tender and golden in color. Add most of the torn mint leaves; set aside some for later. Turn the heat off and let cool.
- In a medium mixing bowl, whisk the eggs, salt, crushed red pepper, and the baking powder. Squeeze the toast to drain any excess milk, then break it apart with your hands and add the bread pieces to the eggs. Whisk again briefly.
- Now stir the zucchini and onions in the egg mixture. If needed, add a little more olive oil to the cast iron skillet. Transfer the egg mixture to the skillet.
- Bake in the 350 F degrees heated oven for 15-20 minutes, or until the surface of the omelet looks done.
- Top the zucchini baked omelet with feta cheese if you like. And garnish with the torn mint leaves you set aside earlier. Serve with lemon wedges on the side and sliced fresh vegetables like tomatoes. A great side dish to this zucchini baked omelet is fattoush salad.
Mediterranean Potato Hash With Asparagus, Chickpeas And Poached Eggs

Mediterranean Potato Hash With Asparagus, Chickpeas And Poached Eggs
Mediterranean breakfast potato hash with Asparagus, chickpeas and poached eggs on top. A flavorful and nutrition-packed meal to kick-start your day.
Servings: 4 people
Ingredients
- Private Reserve extra virgin olive oil extra virgin
- 1 Small yellow onion chopped
- 2 Garlic cloves chopped
- 2 Russet potatoes Diced
- Salt and pepper
- 1 cup Canned chickpeas, drained and rinsed
- 1 Ib Baby asparagus Hard ends removed, chopped into ¼ inch pieces
- 1½ tsp Ground allspice
- 1 tsp Za'atar
- 1 tsp oregano Dried
- 1 tsp sweet paprika or smoked paprika
- 1 tsp coriander
- Pinch sugar
- 4 eggs poached
- Water
- 1 tsp White Vinegar
- 1 Small red onion Finely chopped
- 2 Roma tomatoes chopped
- ½ cup crumbled feta
- 1 cup Fresh parsley Stems removed
Instructions
- Heat 1 ½ tablespoon olive oil in a large cast-iron skillet. Turn the heat to medium-high and add the chopped onions, garlic and potatoes. Season with salt and pepper. Cook for 5-7 minutes, stirring frequently until the potatoes are tender (some of the potatoes may gain a bit of a golden crust, which is good!)
- Add the chickpeas, asparagus, a dash more salt and pepper and the spices. Stir to combine. Cook for another 5-7 minutes. Turn the heat to low to keep the potato hash warm; stir regularly.
- Meanwhile, bring a medium pot of water to a steady simmer and add 1 teaspoon vinegar. Break the eggs into a bowl. Stir the simmering water gently and carefully slide the eggs in. The egg whites should warp around the yoke. Cook for 3 minutes exactly, then remove the eggs from the simmering water and onto kitchen towel to drain briefly. Season with salt and pepper.
- Remove the potato hash from the heat and add the chopped red onions, tomatoes, feta and parsley. Top with the poached eggs. Enjoy!
Challah French Toast With Orange Honey Syrup

Challah French Toast With Orange Honey Syrup
Thick, pillowy slices of challah bread, soaked in a slightly sweet milk-based custard and cooked in a skillet until golden brown. Add a dollop of creme fraiche and a drizzle of orange honey syrup on top for a bit of extra decadence.
Servings: 5 People
Ingredients
For The Orange Honey Syrup
- ½ cup Honey
- ¼ cup Orange juice
- 2 oranges zested and supremed
For The French Toast:
- 1 Loaf challah bread, about 8 to 10 thick slices
- 6 Eggs
- 1 cup whole milk
- 1⅓ tsp Ground cinnamon
- 1 tsp Almond extract
- ¼ tsp kosher salt
- 4 tsp Granulated sugar
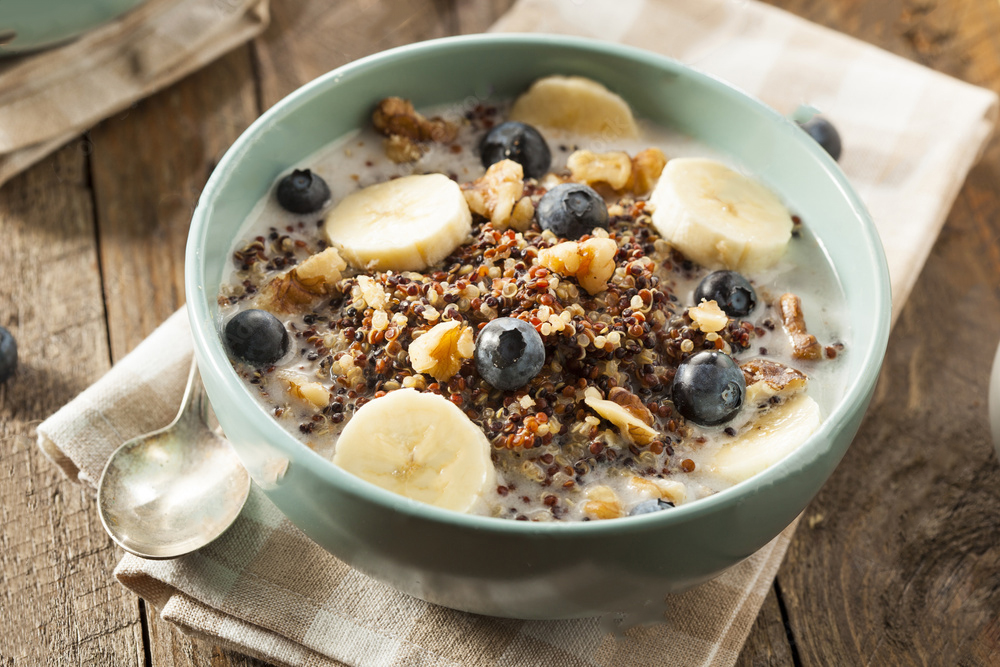
- 1 cup Blueberries
- 4 tbsp Creme fraiche, optional
Instructions
- Supreme the oranges: Zest each orange and set zest aside. Slice the top and bottom off of an orange so you have a flat surface to work with and the flesh of the orange is exposed. Starting at the top, move your knife downward slicing between the flesh of the orange and the white pith. Do this around the entire orange until there isn’t any peel or pith attached.
- Hold the orange over a small bowl to catch any juices, slowly cut each segment out from the membrane and place on a small plate. Repeat with the second orange. Once each orange has been segmented, squeeze the membranes to release any juices into the bowl.
- Make the syrup: In a small saucepan set over medium low heat add ½ cup honey, and ¼ cup of orange juice from when you supremed the oranges. Heat, stirring occasionally just until the mixture is combined and pourable. Transfer to a small container.
- Slice the bread: Slice the loaf into 1 or 1 ½ inch thick slices. You should end up with 8 to 10 slices depending upon the size of your loaf.
- Make the custard: In a pie plate or wide shallow dish use a fork or whisk to combine the eggs, milk, ground cinnamon, almond extract, salt, sugar, and orange zest until well combined.
- Soak the bread: Place as many slices as will fit in a single layer in the dish with the custard. Flip them over so both sides are coated.
- Heat the skillet: Place 2 tablespoons of butter or ghee in a skillet set over medium heat. Once it sizzles add the soaked bread in a single layer. Cook on one side until golden brown, then flip and cook on the other side until golden brown.
- Serve: Place two slices of french toast on a plate. Top with 1 tablespoon of creme fraiche, berries and orange slices. Drizzle with the orange honey syrup and serve. (If you have another orange laying around and you’re feeling fancy, go ahead and zest a little over the top of the toast before serving.)


Chicken and Sun-Dried-Tomato Meatballs

Chicken and Sun-Dried-Tomato Meatballs
Servings: 4 People
Calories: 290kcal
Ingredients
- 4 oil-packed sun-dried tomato halves drained and blotted dry
- 2 garlic cloves
- 1 large jalapeño halved, seeded and coarsely chopped
- Kosher salt
- Freshly ground pepper
- 1/4 cup fine dry bread crumbs
- 1 lb ground chicken breast
- 1 large egg lightly beaten
- 1 tbsp tablespoon fat-free milk
- 1/4 cup cup all-purpose flour for dusting
- 1 14 1/2-ounce can peeled whole tomatoes with their juices
- 1/2 tsp teaspoon dried oregano
- 2 tbsp extra-virgin olive oil
- 1 tbsp chopped flat-leaf parsley
Instructions
- In a food processor, pulse the sun-dried tomatoes, 1 garlic clove, half of the jalapeño, 1/2 teaspoon of salt and 1/8 teaspoon of pepper until finely chopped. Add the bread crumbs and pulse to combine. Transfer the mixture to a large bowl and stir in the chicken, egg and milk. Using lightly moistened hands, roll the mixture into 20 meatballs, a scant 1 1/2 tablespoons each. Dust the meatballs lightly with flour, tapping off any excess.
- Wipe out the food processor and add the remaining garlic clove and jalapeño half; pulse until chopped. Add the tomatoes and their juices and the oregano and process until smooth.
- In a 9-inch cast-iron skillet, heat the olive oil until shimmering. Add the meatballs and cook over moderate heat, turning, until golden but not quite cooked through, 5 to 6 minutes. Transfer to a plate. Add the tomato sauce to the skillet and simmer until slightly thickened, about 2 minutes. Return the meatballs to the skillet and simmer, turning, until just cooked through, about 2 minutes longer. Transfer to a bowl, sprinkle with the parsley and serve.
Notes
One Serving 290 calories, 10.4 gm total fat, 1.8 gm saturated fat, 16 gm carb.
Patatas Bravas

Crispy Patatas Bravas
You can’t go wrong with comforting potatoes, but Spanish patatas bravas takes fried potatoes to the next level, thanks to spicy red bravas sauce. I’ve got all the tips for these crispy-on-the-outside, fluffy-on-the-inside Spanish potatoes.
Servings: 6 People
Ingredients
Potatoes
- ¾ tsp baking soda
- 3-4 Russet potatoes, about 2 pounds peeled and cut into large 2-inch chunks
- Kosher salt
- Extra virgin olive oil or a healthy natural cooking oil of your choice
Brava Sauce
- ¼ cup Extra virgin Olive oil
- 2 garlic cloves sliced
- 1 tbsp tomato paste
- 2 tsp Smoked Paprika
- 1 tsp crushed pepper flakes more or less to your liking
- 1 tbsp cornstarch
- 1 cup vegetable broth
- ½ – 1 tsp sherry vinegar or red wine vinegar I used red wine vinegar
Instructions
Potatoes
- Fill a medium saucepan with water and bring it to a boil.
- As soon as the water boils, add the baking soda (it will foam a little). Carefully add the potatoes and allow the water to come to a boil. Boil the potatoes for about 1 to 2 minutes (no longer). Drain the potatoes well in a colander.
- Transfer the potatoes to a large sheet pan and season them well with kosher salt. Toss to make sure the salt is well distributed, then be sure to spread the potatoes in one single layer
- Set the potatoes aside or transfer to the fridge to cool completely (you can do this ahead of time and leave the potatoes in the fridge overnight, but it’s important for them to cool completely).
- In a medium skillet, heat 1 cup of the oil over medium-high heat. When the oil begins to bubble gently, add one piece of potato to test, if the oil around it bubbles a lot, it is ready. Add the rest of the potatoes and spread them out well. You may need to do this in batches so as to not crowd the pan. Cook in the oil, tossing occasionally and making sure the potatoes are well-coated in the oil, until they are golden brown on all sides, about 20 to 25 minutes. Watch them carefully, as they can go from perfectly cooked to burned in a short time.
- While the potatoes are cooking, work on the bravas sauce (if you did not make it ahead of time).
- Using a slotted spoon, transfer the potatoes to a tray lined with paper towels to drain excess oil. Immediately season with another pinch of kosher salt.
- Finish with a good drizzle of bravas sauce and aioli of your choice (if using). Serve immediately with more bravas sauce to the side.
Brava Sauce
- In a medium pan or skillet, heat about ¼ cup extra virgin olive oil over medium heat. Add the garlic slices and cook, tossing around until the garlic has turned golden brown and the oil is just shimmering (about a couple of minutes).
- Remove the garlic from the pan and discard or keep for other uses.
- Lower the heat and add the tomato paste, smoked paprika, red pepper flakes and cornstarch, whisk to combine. Slowly add the vegetable broth and keep whisking until the broth is incorporated and the sauce has a smooth and somewhat creamy consistency.
- Transfer to a serving bowl or drizzle over your patatas bravas or transfer to a mason jar to store. Allow the sauce to cool before transferring to the fridge.


Tuscan Farro Soup With White Beans & Vegetables

Tuscan Farro Soup With White Beans & Vegetables
Farro soup with white beans and vegetables is a rich, hearty, and flavorful meal. Eat it on its own, pair it with crusty garlic bread or a simple salad and dinner is served! It's like a hug in a bowl to keep you warm on chilly nights!
Servings: 8 People
Calories: 172.4kcal
Ingredients
- Extra Virgin Olive oil
- 1 medium red onion, halved and thinly sliced
- 1-2 carrots peeled and sliced into ¼-inch thick rounds
- 2 celery sticks chopped
- Kosher salt
- 2 large garlic cloves minced
- 6 cups low-sodium vegetable or chicken stock
- 1 28 oz can whole San Marzano tomatoes
- 1 15 oz can white beans drained and rinsed
- 1 cup farro rinsed
- 1 inch Parmesan rind
- 2 cups resh baby spinach packed
- 1 cup chopped parsley
- 1 tbsp red wine vinegar
- Grated Parmesan for serving
Instructions
- In a large Dutch oven or pot, heat 2 tablespoons extra virgin olive oil over medium heat until shimmering. Add the onions, carrots, and celery. Season with a little kosher salt and cook, tossing occasionally until the vegetables have softened.

- Add the garlic and toss for 30 seconds or so, then add the tomatoes, stock, white beans, farro, and parmesan rind.
- Bring the liquid to a boil, then lower the heat watching for the steady, gentle simmer. Allow the soup to simmer until the farro is tender, about 30 minutes or so.
- Turn the heat off and remove the Parmesan rind (sometimes the rind will have dissolved into the soup). Stir in the spinach, parsley, and red wine vinegar.


Notes
Nutrition
Cioppino with Parsley and Olive Gremolata

Cioppino with Parsley and Olive Gremolata
Cioppino is a satisfying seafood stew containing a collection of clams, mussels, white fish and shrimp in a tomato-fennel broth. Full of flavor and texture, this hearty stew is perfect for Sunday supper or a special holiday meal.
Servings: 10 people
Ingredients
For The Parsley-Olive Gremolata (Optional)
- ½ Bunch parsley about 2 ounces, roughly chopped
- The zest from one orange
- ½ cup Mixed olives Pitted
- 1 Clove garlic peeled and roughly chopped
- ½ kosher salt
- ½ Red pepper flakes, optional
- 2 tbsp Olive oil extra-virgin For The Cioppino
For The Cioppino
- 1 pound Clams, scrubbed well
- 1 pound Mussels debearded and scrubbed well
- ¼ cup Olive oil Extra-virgin
- 1 Large onion cut into ½-inch dice (about 2 cups)
- 1 Large fennel bulb, cut into ½-inch dice (about 2 cups)
- Kosher salt to taste
- 2 cloves garlic, Finely minced
- 1 12 ounce Jar roasted red peppers, drained and roughly chopped
- 2 tsp Dried oregano
- 2 tsp Dried thyme
- 1¼ cups Dry white wine
- 1 28 ounce can whole tomatoes
- 1¼ cups Seafood stock
- 1 pound Skinless firm white fish, such as halibut or cod, cut into 1-inch pieces
- 1 pound Large shrimp, peeled and deveined
- Grilled sourdough bread for serving, optional
Instructions
Make The Parsley-Olive Gremolata
- Make the gremolata: Place chopped parsley, orange zest, olives, garlic, salt and red pepper flakes (if using) in a food processor and pulse a few times to combine. Scrape down the sides of the food processor and add olive oil. Process until a uniformly chunky texture is achieved
- Let the gremolata rest: Allow gremolata to sit at room temperature while you prepare the cioppino, to allow the flavors to fully bloom.
Make The Cioppino:
- Steam the shellfish: Prepare a stockpot with a steamer basket insert large enough to hold the clams and mussels. Bring 2 cups of water to boil in the stockpot, reduce heat to a simmer and steam mussels and clams under a lid until they just open, 5-8 minutes. Remove pot from heat and place all opened mussels and clams in a large bowl. Discard any mussels or clams that don’t open. Reserve 1 cup of steaming liquid.
- Saute the aromatics: In a large dutch oven or 8-quart stockpot, heat olive oil over medium until the surface just begins to shimmer. Add chopped onion, fennel and a hearty pinch of salt and saute until onion is softened and translucent, about 8-10 minutes. Add minced garlic, roasted red peppers, dried oregano and dried thyme. Saute until garlic is very fragrant and most of the liquid from the vegetables has evaporated.
- Deglaze the pot: When the red pepper mixture begins to look dry and sticky, add white wine. Use a wooden spoon to scrape up any vegetable bits clinging to the bottom of the pot. Bring mixture to a boil and simmer for 5 minutes.
- Finish the soup base: Crush whole tomatoes roughly in your hands and add them to the white wine mixture along with any collected juices in the can, seafood stock and 1 cup of reserved steaming liquid. Allow mixture to simmer for 20 minutes uncovered. Taste and add salt as needed.
- Cook the fish and shrimp: Add whitefish and shrimp to the pot and bring to a simmer. Cover the pot and cook for 2-3 minutes, or until the fish is opaque and shrimp are curled and pink.
- Finish the soup: Remove pot from heat and stir in mussels and clams. Taste and add salt as needed. Serve immediately, topped with a big spoonful of the parsley-olive gremolata.
Turkish Lentil Soup (Mercimek Çorbası)

Turkish Lentil Soup (Mercimek Çorbası)
Turkish Red Lentil Soup (Kırmızı Mercimek Çorbası) is velvety, comforting, and nutritious! Plus, it’s so easy to make with lentils, a few veggies, and spices like Aleppo pepper! Naturally gluten-free, and with a simple swap for a vegan option, this Turkish lentil soup is ready in about 30 minutes.
Servings: 6 People
Ingredients
- 5 tbsp Olive oil Extra virgin
- 1 Medium yellow onion, chopped
- 3 Garlic cloves minced, divided
- 2 to 3 Carrots peeled and chopped
- 1 Medium russet potato, peeled and small diced or chopped
- Kosher salt
- 2 tbsp Tomato paste
- 6 cups Low-sodium vegetable broth
- 2 tsp Aleppo pepper, divided
- 1 tsp Cumin
- ½ tsp Coriander
- 1 cup Red lentils picked over and rinsed
- 1 Lemon, cut into wedges
Instructions
- In a large Dutch oven or cooking pot, heat 2 tablespoons extra virgin olive oil over medium-high heat until shimmering.
- Add the onions, 2 minced garlic cloves, carrots, and potatoes. Season with a good dash of kosher salt, and cook, stirring occasionally until the vegetables have softened (about 5 to 7 minutes).
- Add the tomato paste and toss to coat the vegetables with the paste, then add the broth 1 teaspoon of Aleppo-style pepper and the rest of the spices.
- Add the lentils and stir.
- Allow the soup to come to a rolling boil for 4 to 5 minutes, then lower the heat and cover the Dutch oven with the lid leaving a small opening.
- Let the soup simmer on the lowest heat setting for about 15 to 20 minutes or until the lentils and the vegetables are completely tender. (Check occasionally and give the soup a stir as needed. If it is getting too thick, add a little bit more vegetable broth about ½ to 1 cup more).
- Remove the pot from the heat and carefully blend the soup using an immersion blender until smooth and creamy. (Alternatively, transfer the soup to a standard blender, let some of the steam escape. Blend in batches until all of the soup is smooth.)
- To finish, in a small skillet, warm about 3 tablespoons extra virgin olive oil over medium heat. Add the remaining Aleppo pepper and minced garlic and cook briefly until the garlic is golden brown and the oil has taken on a red hue from the Aleppo pepper. Remove from the heat and pour the warmed oil all over the soup.
- Serve with lemon wedges to the side.
Mediterranean-Style Steamed Clams

Mediterranean-Style Steamed Clams
Steamed clams, prepared Mediterranean-style in white wine broth with onions, garlic, bell peppers and fresh herbs. It's important to clean the clams well before you cook them. Clams will cook quickly, and they area ready when the majority have opened up. Serve with your favorite crusty bread to sop up all the goodness!
Servings: 4 people
Instructions
- Sort through clams and discard any already open ones that won't close.
- Prepare three large bowls, fill two of them with cool water and add a good amount of salt to each (⅓ cup of salt to 1 gallon of water). Fill the third bowl with water but NO salt this time.
- Clean the clams. Put the clams in the first bowl of cool salted water and set them aside for 20 minutes or so. Transfer the clams to the second bowl, making sure to discard any clams that are open ( and, of course, discard the dirty water from the first bowl). Set aside for another 20 minutes or so. Using a small brush, scrub the clams clean and transfer them to the last bowl of unsalted water. Allow them another 20 minutes or so. Transfer the clean clams to a tray and cover with a damp towel. (It helps to add some ice to the water bowls to keep them cool water; alternatively, you can place the bowls in the fridge) (see notes for a shortcut)
- Make the white wine broth. In a large Dutch oven heat ¼ cup extra virgin olive oil over medium heat until shimmering but not smoking. Add the onions, peppers, and garlic. Season with kosher salt and pepper and cook for 5 minutes or so, tossing regularly and making sure the garlic does not burn. (See note, if you want to add Spanish choriz)
- Stir in the tomatoes and add the cumin, paprika and red pepper flakes (or Aleppo pepper). Pour in the white wine and water. Raise the heat to bring the liquid to a gentle boil. Cook for a few minutes until the tomatoes soften a bit (about 5 to 7 minutes). Add another pinch of salt, if needed.
- Steam the clams in the white wine sauce. Lower the heat back to medium and add the clams. Cover with a lid and cook until the majority of the clams are open (anywhere from 7 to 10 minutes) Discard any clams that are still closed.
- Turn the heat off. Add the green onion and parsley.
- Serve immediately in bowls with a side of your favorite crusty bread.


Catalan bread Salad – Escalivada
Catalan bread Salad – Escalivada
This Catalan bread salad, also known as escalivada in its native Spain, is a rustic summer staple made with day-old bread and grilled or roasted vegetables including tomatoes, eggplant, zucchini, bell peppers, and (surprise!) figs. Spain’s answer to panzanella.
Calories: 845kcal
Ingredients
For the bread salad
- 1 large eggplant cut lengthwise into slices 1/4-inch (6-mm) thick
- 3 zucchini or summer squash cut lengthwise into slices 1/4-inch (6-mm) thick
- 6 gypsy or bell peppers halved and seeded
- 1 red or yellow onion cut into slices 1/4-inch (6-mm) thick
- 1/2 Cup olive oil extra virgin
- 4 thick slices day-old bread hewn from an artisanal oaf whole-grain if desired whether store-bought or homemade
- 2 ripe heirloom tomatoes cut into 1-inch chunks
- 2 cups mixed flat-leaf parsley and basil leaves torn into pieces
- 8-10 fresh figs any variety halved (optional)
For the anchoïade
Instructions
Make the bread salad
- Prepare a fire in a charcoal grill.
- Brush the eggplant, zucchini, pepper, and onion slices generously with some of the olive oil.
- Grill the vegetables, turning as needed, until soft and slightly charred, 6 to 8 minutes. If desired, cut each slice into smaller pieces. Toss in a bowl.
- Brush the bread slices with some of the olive oil. Grill, turning occasionally, until slightly charred, about 4 minutes. Transfer to a platter and cut each slice in half or smaller pieces.
Make the anchoïade
- Place the garlic and anchovies in a food processor or a mortar and process or pound into a paste. Add the walnuts and coriander seeds and pound to incorporate them.
- Arrange the grilled vegetables on the platter along with the bread, tomatoes, parsley, basil, and fresh figs, if using. Spoon the anchoïade over the top and serve.


Catalan bread Salad – Escalivada
Asparagus Stir-fry
This Catalan bread salad, also known as escalivada in its native Spain, is a rustic summer staple made with day-old bread and grilled or roasted vegetables including tomatoes, eggplant, zucchini, bell peppers, and (surprise!) figs. Spain’s answer to panzanella.
Calories: 845kcal
Ingredients
For the bread salad
- 1 large eggplant cut lengthwise into slices 1/4-inch (6-mm) thick
- 3 zucchini or summer squash cut lengthwise into slices 1/4-inch (6-mm) thick
- 6 gypsy or bell peppers halved and seeded
- 1 red or yellow onion cut into slices 1/4-inch (6-mm) thick
- 1/2 Cup olive oil extra virgin
- 4 thick slices day-old bread hewn from an artisanal oaf whole-grain if desired whether store-bought or homemade
- 2 ripe heirloom tomatoes cut into 1-inch chunks
- 2 cups mixed flat-leaf parsley and basil leaves torn into pieces
- 8-10 fresh figs any variety halved (optional)
For the anchoïade
Instructions
Make the bread salad
- Prepare a fire in a charcoal grill.
- Brush the eggplant, zucchini, pepper, and onion slices generously with some of the olive oil.
- Grill the vegetables, turning as needed, until soft and slightly charred, 6 to 8 minutes. If desired, cut each slice into smaller pieces. Toss in a bowl.
- Brush the bread slices with some of the olive oil. Grill, turning occasionally, until slightly charred, about 4 minutes. Transfer to a platter and cut each slice in half or smaller pieces.
Make the anchoïade
- Place the garlic and anchovies in a food processor or a mortar and process or pound into a paste. Add the walnuts and coriander seeds and pound to incorporate them.
- Arrange the grilled vegetables on the platter along with the bread, tomatoes, parsley, basil, and fresh figs, if using. Spoon the anchoïade over the top and serve.


Catalan bread Salad – Escalivada

Catalan bread Salad – Escalivada
This Catalan bread salad, also known as escalivada in its native Spain, is a rustic summer staple made with day-old bread and grilled or roasted vegetables including tomatoes, eggplant, zucchini, bell peppers, and (surprise!) figs. Spain’s answer to panzanella.
Ingredients
For the bread salad
- 1 large eggplant cut lengthwise into slices 1/4-inch (6-mm) thick
- 3 zucchini or summer squash cut lengthwise into slices 1/4-inch (6-mm) thick
- 6 gypsy or bell peppers halved and seeded
- 1 red or yellow onion cut into slices 1/4-inch (6-mm) thick
- 1/2 Cup olive oil extra virgin
- 4 thick slices day-old bread hewn from an artisanal oaf whole-grain if desired whether store-bought or homemade
- 2 ripe heirloom tomatoes cut into 1-inch chunks
- 2 cups mixed flat-leaf parsley and basil leaves torn into pieces
- 8-10 fresh figs any variety halved (optional)
For the anchoïade
Instructions
Make the bread salad
- Prepare a fire in a charcoal grill.
- Brush the eggplant, zucchini, pepper, and onion slices generously with some of the olive oil.
- Grill the vegetables, turning as needed, until soft and slightly charred, 6 to 8 minutes. If desired, cut each slice into smaller pieces. Toss in a bowl.
- Brush the bread slices with some of the olive oil. Grill, turning occasionally, until slightly charred, about 4 minutes. Transfer to a platter and cut each slice in half or smaller pieces.
Make the anchoïade
- Place the garlic and anchovies in a food processor or a mortar and process or pound into a paste. Add the walnuts and coriander seeds and pound to incorporate them.
- Arrange the grilled vegetables on the platter along with the bread, tomatoes, parsley, basil, and fresh figs, if using. Spoon the anchoïade over the top and serve.


Grilled Watermelon with Chili and Honey-Lime Sauce

Grilled Watermelon with Chili and Honey-Lime Sauce
Juicy, charred, and a little smoky, this Grilled Watermelon with Chili and Honey-Lime Sauce is a quick and easy summer dish that will truly stand out! Pro tip: Use a mini watermelon. A "small" 2 ½-pound watermelon will yield plenty of grilled watermelon to feed a small crowd! Serve it as a side with harissa chicken or grilled fish, or as a summery dessert with a scoop of vanilla ice cream and a drizzle of honey.
Servings: 6 people
Calories: 96.9kcal
Ingredients
Instructions
- Heat an outdoor gas grill or an indoor griddle or cast iron grill to high.
- Slice the melon. Wash the melon and trim the ends so that you’re able to set the melon flat on your cutting surface. Cut the melon it into two halves, then cut the halves into quarters. From there slice into ½ -inch triangles with the rind on (do not remove the rind/skin).
- Grill. Arrange the melon wedges or triangles on the prepared hot grill in one single layer. Grill over high direct heat for about 2 to 3 minutes on each side, watching for some grill marks to appear.
- While the melons are on the grill, quickly prepare the chili and honey-lime sauce. In a small microwave safe bowl, combine the honey, lime juice, and Aleppo pepper flakes (or red pepper flakes). Mix with a spoon then warm the mixture in the microwave for just a few seconds (no more than 10 seconds). Or, you can put your honey in a glass jar and cover tightly and leave it in a bowl of warmed water until it has loosened).
- Arrange the grilled watermelon
Notes
- If serving as an appetizer, this dish can serve 6 people or so.
- If you don’t plan on using the entire melon to make this recipe, cover fresh, uncooked melon with plastic wrap and refrigerate for later.
- Cut in thick triangles and do not remove the rind! Do not cut the melon slices any thinner than ½ inch, and make sure to leave the skin on which will help keep the melon from falling apart as it cooks.
- Serve immediately! Grilled watermelon is best served and enjoyed immediately off the grill, so be sure to have prepared anything else you need before you cook the watermelon.


Homemade Ciabatta Garlic Bread

Homemade Ciabatta Garlic Bread
Try this no-fail recipe for how to make garlic bread perfectly every time! Crusty on the outside, chewy on the inside, and packed with big flavor thanks to a delicious extra virgin olive oil, fresh herbs, and garlic mixture
Ingredients
- 1 lb loaf ciabatta bread
- 1 cup Italian parsley
- 1 tsp dried rosemary
- 1 tsp dried oregano
- Kosher salt
- pepper
- 4-5 cloves garlic peeled
- ⅓ cup Extra virgin olive oil
- ½ cup grated or shredded parmesan
Instructions
- Preheat the oven to 400 degrees F.
- Add the garlic, rosemary, oregano, and parsley to a small food processor and blend. Drizzle in the olive oil from the top opening of the food processor while everything is blending. Season with kosher salt and black pepper
- Place the bread flat on a cutting board. Place your non-dominant hand on top of the bread. Take a knife and slice the bread in half horizontally.
- Spoon the herb and garlic oil equally onto both halves of the bread and spread it all over. Put the bread halves back together.
- Line a large sheet pan with foil. Place the bread flat on the pan and cover with another piece of foil. Crimp the foil sides to close tightly.
- Bake the foil-wrapped bread on the center rack of the heated oven for 10 minutes.
- Remove the bread from the oven and uncover it. Separate the two halves of bread and place them side by side on the sheet pan.
- Sprinkle grated parmesan onto the bread.
- Return the sheet pan with the bread to the oven for another 10 minutes, until the bread crisps with golden edges and some of the cheese is slightly golden.
- Cut into 1-inch slices and serve immediately.
Simit (Turkish Sesame Bread Rings)

Simit (Turkish Sesame Bread Rings)
Simit is truly a quintessential Turkish street food. Coated in sesame seeds and baked until golden brown, it is crunchy on the outside, but soft on the inside. These sesame bread rings are perfectly delicious on their own, but you can also slice them in half for making sandwiches.
Servings: 8 people
Ingredients
- ¼ Teaspoon sugar
- 1 tbs Active dry yeast
- 1¾ cups Lukewarm water divided
- 510 g All purpose flour
- 2 tsp sea salt
- ½ cup grape molasses, date, fig or carob molasses
- 4 tbsp water combined with the grape molasses
- 2 cups Golden sesame seeds
Instructions
- Bloom the yeast: Into a medium bowl, combine ¼ teaspoon sugar and 1 ½ cups lukewarm water (between 90-110°F). Add the yeast, mix with a small spoon and set aside for 5 to 8 minutes, until the yeast becomes foamy.
- Make the dough: Into a large bowl, add the flour and salt. Stir to combine then make a well in the center. Add the yeast mixture and stir to form a coarse dough.
- Knead the dough: Turn out onto a lightly floured surface and knead for about 5 minutes, or until the dough is smooth and elastic. Roll the dough into a ball and place in a lightly oiled bowl, turning to coat. Cover with plastic wrap or a kitchen towel and set aside in a warm, draft-free place for 45 minutes to 1 hour, or until doubled in size. A sunny spot on your countertop is perfect.
- Preheat the oven, prepare the baking sheets and dipping station: Preheat the oven to 400°F and line 2 large size baking sheets with parchment paper. Combine the grape molasses, with the remaining ¼ water in a large bowl, and whisk together. Pour the sesame seeds onto a large plate. Set it next to the bowl of molasses water.
- Deflate and shape the dough: Dump the dough onto a lightly floured work surface and stick your fist in the center of it to deflate or knock back the dough. Shape it into a ball and divide into 8 even sized pieces.
- Cut and Stretch the dough: Working with one piece of dough at a time, use your hands to roll each dough segment into a long rope about 24-inches long. The dough is sturdy so you can apply gentle pressure as you roll and stretch the rope. I tend to work with my hands side by side in the center of the dough, rolling the dough back and forth and separating my hands as the dough lengthens.
- Twist the dough: Fold each rope in half so two ends align and use your hands to twist it into a two stranded “rope.” Join the ends together to make a circle, and press them firmly together to seal the circle. Gently shape the area where you pressed the ends together to make it rounded and not flat. Repeat with the remaining dough. In the end you should have 8 twisted rope circles.
- Dip each ring: Dip each ring, first into the molasses mixture, submerging it completely. If you don’t have enough liquid to submerge it, flip it over so both sides are coated. Remove it from the molasses mixture, gently shaking off any excess. Set the bread ring in the sesame seeds, turn gently to coat both sides. Transfer to the prepared tray and set aside at room temperature for about 15 minutes, to puff slightly. Repeat with the remaining ropes.
- Bake: Place the baking sheet in the pre-heated oven for 20 minutes or until deep golden brown and cooked through. Transfer to a wire rack to cool.
Rosemary Focaccia With Roasted Garlic

Rosemary Focaccia With Roasted Garlic
Learn how to make this rosemary focaccia bread recipe with an extra kick of flavor from roasted garlic. Once you master this crispy on the outside, chewy on the outside Italian bread you'll make it again and again! Don't worry about the time stretching or dimpling the dough. Focaccia is easy to make, and most of the time is inactive.
Servings: 12 people
Ingredients
Biga
- 125g g Warm water (80-90°F)
- 125 g Bread flour
- ½ tsp Active dry yeast
Focaccia
- All of the biga
- 350 g Warm water
- ¾ olive oil divided, plus more for coating
- 440 g Bread flour
- 2 tsp kosher salt
- ½ tsp Active dry yeast
- 2 6-inch Rosemary sprigs
- 1 Large head garlic
- ¾ tsp flaky sea salt, divided
Instructions
- Make the biga: In a medium bowl combine the water, flour and yeast. Cover the bowl with plastic wrap and let it sit at room temperature for 1 ½ to 2 hours. Then transfer it to the refrigerator overnight and up to 48 hours.
- The next day make the dough: Remove the biga from the refrigerator. It will look fully hydrated, expanded and should be a little bubbly.
- Into a large bowl add the water, all of the biga (235g), 3 tablespoons of olive oil and stir to combine. It’s ok if it doesn't totally come together, you just want to break up the biga a bit.
- Add the flour, salt, and yeast and stir with a wooden spoon until the flour is hydrated. You will have a sticky, bumpy, shaggy but homogeneous dough. Cover with plastic wrap and set it in a warm corner of your kitchen for 30 minutes.
- Lift and fold the dough: Wet your hands to stretch and fold the dough. To do this, scoop your fingers down the sides of the bowl so they meet under the dough in the middle. Lift the dough up above the bowl. You should have dough spilling over the top of your index fingers and your pinky fingers reaching down toward the bowl in an upside down U-shape. Put one end down in the bowl, then the other so they overlap a bit. Lift and fold the dough over itself 3 times. Coming from different edges of the dough each time. Cover with plastic wrap. Repeat this process every 30 minutes for the next 2 ½ hours. You don’t want to rush this as it helps develop the structure of the dough and builds flavor.
- Transfer the dough to the baking sheet: Place a sheet of parchment paper in the bottom of a baking sheet for thinner focaccia or a 9×13 cake pan for thicker focaccia. Generously coat the parchment paper with ⅓ cup olive oil. Place the dough on the baking sheet or pan, and turn it over gently to coat.
- Stretch and dimple the dough: Spread your fingers apart and bend them like you’re trying to mimic the talons of a bird. Using the tips of your fingers gently insert them into the dough in multiple places, creating dimples and stretching the dough gently toward the edges of the pan. You will do this 3 to 4 times over the next 1 to 1 ½ hours.
- Preheat the oven to 450°F.
- Roast the garlic: While you rise and stretch the dough, roast the garlic. You will add the roasted garlic to the dough during the stretching process.
- Using a sharp knife, slice the top ¼ to ½-inch off the top of the garlic bulb exposing the individual cloves. Remove any loose papery skins. Place the garlic cut side up in the center of a piece of foil large enough to envelope the bulb.
- Drizzle the garlic with 1 tablespoon olive oil and sprinkle it with salt and pepper. Make sure the whole bulb is coated in the oil. Fold the foil around the garlic. Place it in a small baking dish or ramekin and pop it in the oven for 25-30 minutes. When it’s ready the cloves will be soft, and creamy.
- Add garlic and rosemary to the dough: Remove the garlic from the oven, open the foil and let it cool until it’s easy to handle but still warm. Press on the uncut base of the bulb to squeeze the cloves out. Drop them onto the focaccia dough in different places.
- Strip the rosemary sprigs of their needles and sprinkle them across the dough. Press the garlic and rosemary into the dough when you dimple and stretch it.
- Add olive oil and dimple one more time: Before the final dimple, drizzle 3 tablespoons of olive oil over the bread and sprinkle with ½ teaspoon of flaky sea salt. Dimple it again.
- When all is said and done the dough should be coated in oil, pretty close to the edges of the sheet pan, and have lots of bubbles and dimples.
- Bake the focaccia: Place the sheet pan in the oven and bake for 18-20 minutes. When it’s done it should be golden brown with darker brown bubbles. Remove from the oven.
- Drizzle with more olive oil and sprinkle with a ¼ teaspoon flaky sea salt. Give it about 5 minutes to cool, then transfer it to a cutting board. It should be crisp on the outside, tender, slightly chewy and full of air pockets on the outside. Eat it as is or top it with my favorite, eggplant caponata.
Easy Challah Bread Recipe

Easy Challah Bread Recipe
BEST Challah Bread recipe out there. Anyone can make this satisfying braided loaf enriched with eggs and topped with sesame seeds! You can also use challah dough to make smaller loaves, buns, and even a beautiful round challah! Allow about 2 hours of inactive time for best results. Recipe makes 1 loaf (about 20 slices).
Servings: 12 slices
Ingredients
- 1½ Active dry yeast
- 1 cup Warm water
- 4 cup All-purpose flour
- 7 Large egg yolks you will use some of the egg whites later
- ¼ cup Sugar
- 1 tsp Salt
- 6 tbsp Early Harvest Greek extra virgin olive oil
- 2-3 tbsp toasted sesame seeds
Instructions
- In a small bowl, combine the yeast with the warm water. Add a large pinch of sugar. Stir to dissolve the yeast. Set aside for 10 minutes or so, until the yeast is activated forming a foamy layer.
- In a large mixing bowl, combine the flour, egg yolks, sugar, salt, and oil. Mix with a wooden spoon.
- Add the yeast mixture, and mix with the wooden spoon until the dough is too hard to mix. Transfer the dough to a lightly floured work surface, and knead by hand for 10 minutes. If the dough is too sticky as you knead, add a very little bit of flour and continue kneading until the dough is soft and smooth.
- Place the dough in a large, lightly oiled mixing bowl. Cover with a kitchen cloth and keep it in a warm spot for 1 ½ until the dough rises (the dough is ready when it has doubled in size).
- Punch the dough down and turn it back onto a lightly floured work surface. Divide the dough into three equal pieces, then roll each piece into a rope that's about 16 to18 inches long. Braid the three ropes together like you would hair. Squeeze both ends together to complete the braid.
- Place the braided loaf on a large baking sheet lined with parchment paper. Cover and return to a warm spot for another 30 to 45 minutes allowing it to rise again. Meanwhile, preheat the oven to 350 degrees F.
- Brush the loaf generously with about 2-3 tablespoon of the egg whites you reserved earlier. Sprinkle the sesame seeds on top.
- Bake in the 350 degrees F heated-oven for 20-25 minutes, or until golden brown. Let the challah bread cool before slicing.
Easy Homemade Pita Chips Recipe

Easy Homemade Pita Chips Recipe
Perfectly crispy homemade pita chips baked with extra virgin olive oil and your seasoning of choice (I used za'atar, but you can change things up to your liking)! Perfect by themselves for a snack or added to a little mezze platter with your favorite dips (lots of dip ideas below).
Servings: 24 chips
Ingredients
- 2 to 3 Pita bread store-bought or homemade
- Olive oil Extra virgin
- Kosher Salt
- Seasoning of choice I used a generous sprinkle of Za'atar
Instructions
- Heat the oven to 425 degrees F. And prepare a large sheet pan (do not line with parchment).
- Split the pita pockets in half to make single rounds of pita. Place each pita flat on your cutting board and split them in half from the seam with a sharp knife or kitchen shears (you should end up with 2 single rounds of pita). Note: If your pitas are the thick, single-layer kind, you can skip this step as you can't split them.
- Brush with extra virgin olive oil & Season. Brush the pita rounds with extra virgin olive oil and season with kosher salt and za'atar (do this on both sides)
- Cut into triangles. Using a knife or a pair of kitchen shears again, cut each round of pita into 8 triangles.
- Bake! Arrange the pita triangles on the prepared sheet pan. Bake anywhere from 5 to 10 minutes, checking occasionally to turn over the pita triangles that have gained color, until you have pita chips that are crispy and golden brown to your liking.
Za’atar Bread Rolls

Za’atar Bread Rolls
You've never had bread rolls like this before! Fluffy, pillowy bread rolls with a Mediterranean twist — a generous sprinkle of za'atar and Aleppo-style pepper — are easier to make than you think. They take a little time, though, so save them for a day when you have some to spare! I like eating za'atar bread rolls for breakfast with fried eggs, labneh, or marinated feta.
Servings: 9 Rolls
Ingredients
- 1¼ Cups water, warm (for yeast)
- 1 tbsp Sugar
- 2½ tsp Yeast
- 3¾ cups Flour
- ¾ tsp Fine sea salt
- 2 tbsp. Olive oil extra virgin, plus more for later
- 6 tbsp za’atar
- ½ tsp Aleppo pepper
Instructions
- In a large liquid measuring cup add the warm water (105-110°F). Add the sugar and yeast to the water and whisk it together. Set it aside for about 5 minutes until the yeast is foamy.
- Place the flour in a large mixing bowl and whisk in the salt, then make a well in the center. Mix in the yeast water and the extra virgin olive oil until well combined – add more water if needed; you want a moist dough, it shouldn’t be too dry.
- Transfer the dough to a flour-dusted surface and knead for around 8 to 10 minutes, until smooth and elastic. Wash and dry the mixing bowl, then lightly oil it.
- Return the dough to the bowl, drizzle with a little more olive oil, and leave it to rise for around 1 to 1 ½ hours (this will depend on how warm your kitchen is), until doubled in size.
- When the dough has risen, turn it out onto a clean surface, knock it back, and roll into a rectangle about 10 x 16 inches. Brush over a layer of olive oil and evenly sprinkle the za’atar and Aleppo pepper, leaving a ½-inch border around the edges. Pat the spice mixture gently into the dough with the back of a tablespoon.
- Starting with a short side, roll the dough up as tightly as you can. Trim off the uneven excess bits at the end. Slice the dough into 8 to 9 pieces. Pour enough oil to just cover the base of a 10-inch cast-iron skillet and pop in the slices, swirl facing up. Cover and set aside for the rolls to double in size, about 30 minutes.
- Meanwhile, preheat the oven to 400 degrees F. When the buns have roughly doubled in size, bake for 25 to 30 minutes, until golden. As soon as they come out of the oven, drizzle generously with olive oil and leave to absorb in the skillet for 10 minutes before serving.
Easy Greek Easter Bread
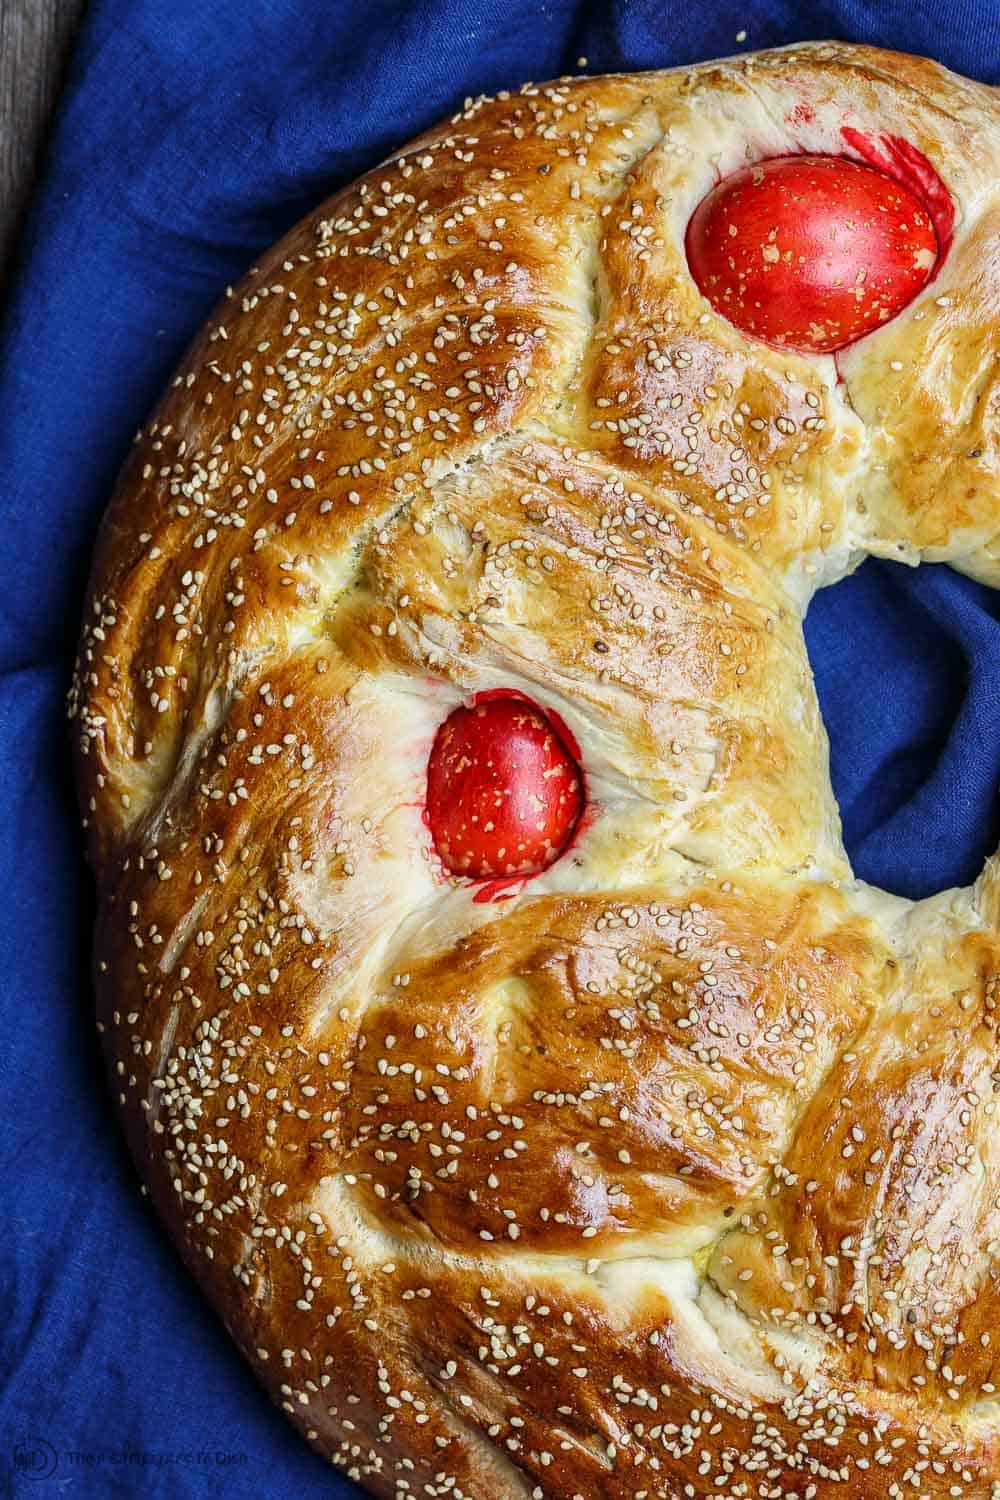
Easy Greek Easter Bread
Tsourike: Greek Easter Bread is a sweet yeast bread that is a bit brioche-like. You'll love this perfectly dense braided loaf that's adorned with red-dyed eggs.
Servings: 16 slices
Ingredients
- 2¼ tsp Active dry yeast
- 5½ cups All-purpose flour more for dusting
- ½ cup Sugar
- 1⅓ cup Milk
- 5 tbsp Unsalted butter
- 1 tsp Fine salt
- 2 Large eggs, beaten, PLUS 1 egg beaten with 1 teaspoon water (egg wash)
- 2 tbsp Anise seed
- ¼ tsp Vanilla extract
- 3 Hard-boiled eggs, dyed red and fully dried
- Olive oil
- 2 to 4 tbsp Toasted sesame seeds (optional)
Instructions
- In the bowl of a stand mixer, combine ⅓ cup hot water (about 110 degrees F) with the yeast, 1 tablespoon of the flour, and 1 tablespoon of the sugar. Whisk gently. Cover with a towel and leave aside for 10 minutes until bubbly.
- In the meantime, heat the milk in a small sauce pan until the edges begin to bubble, about 4 to 6 minutes. Remove from heat and stir in the butter, remaining sugar and salt. Set aside for 5 minutes to cool.
- Using the paddle attachment of your stand mixer, stir the milk mixture into the yeast mixture. While paddle is stirring, add the 2 beaten eggs. Gradually mix in the flour, anise seed, and vanilla extract. Beat unit a soft dough forms. Increase speed to medium (or medium-high if needed) until the dough pulls away from the sides of the bowl.
- Transfer dough onto a lightly floured surface (dough will be sticky at this point.) Kneed by hand until very smooth (about 5 minutes), then place dough into a lightly-oiled bowl. Cover and place in a warm, closed space for 1 ½ hours, until doubled in size. (I had heated my oven to lowest temperature, then turned it off a few minutes before placing my covered dough in.)
- Punch dough down, and transfer to floured surface again. Cut dough into 3 equal parts, and gently roll each to form a long 16-inch rope. Transfer to a large baking sheet lined with parchment paper. Press ropes together at one end and braid fairly loosely. Form into a circle and press together on the other side. Stretch the circle to about 10 inches across and the hole in the middle about 3 ½ inches wide.
- Cover with a clean towel and place back in warm space for 1 hour until doubled in size.
- Rub the dyed eggs with olive oil, and buff with paper towel. Select three spots in the dough, evenly spaced, and gently insert the eggs. Cover and return to warm space. Let rise 1 more hour until dough doubles in size.
- Heat oven to 350 degrees F. Brush the bread with the egg wash and sprinkle with toasted sesame seeds. Bake about 45 minutes until braided loaf turns a nice deep golden brown (should sound hallow when you tap on it.)
- Let cool for about 30 minutes before serving. Serve with more boiled eggs, honey or other breakfast items. Enjoy!


Traditional Sangria

Asparagus Stir-fry
authentic Spanish sangria recipe is the best and easiest sangria recipe that exists.
Ingredients
- 1 Bottle Red Wine Use a decent young and fruity table wine — something you would definitely drink on its own, but one that isn’t too complex (or expensive!). It’s important that it’s good quality (otherwise your hangover will be awful), and also important that it isn’t overly oaky in flavor. That’s why a fruity young red wine works best. You can, of course, sub other wines — but then it becomes a different sangria. See below for options!
- Fruit The most common fruit you see in red sangria in Spain is by far citrus fruit. Lemon and orange are key ingredients in the majority of Spanish sangrias. Other fruits you may see (and are optional) are peach or apricot and green apple.
- Spices Usually traditional sangria recipes keep it simple and stick to a flavorful stick of cinnamon. But you can add star anise, nutmeg, ginger, cloves… the options for experimentation are endless!
- Sugar Again — totally optional. Taste it without sugar and if you need it to be a bit sweeter, add it little by little. I prefer adding it in the form of simple syrup, as it incorporates better.
- Soda You guessed it, it’s optional! The truly traditional Spanish sangria recipe is actually lacking any carbonation. That’s because carbonated drinks weren’t even invented when sangria got its start! But if you like the extra fizz, add a bit of soda water or lemon soda to your sangria, right before drinking.
- Extra Alcohol If you want your sangria to pack more of a punch, add a couple of ounces of Spanish brandy or vermouth. My favorite sangria bars in Spain add vermouth to their sangria jugs.
Instructions
- Make a simple syrup. I like to use a 1:1 ratio for mine. Let it cool while you prepare the rest of the sangria.

- Take your citrus fruit (I use lemon and orange) and peel the rind. Then juice the fruits.

- Now you just combine everything! Put your wine into a big pitcher (or pot) and add all of the citrus juice, peeled rinds, and simple syrup (if using).

- Now give it a stir and add your spices (I use a cinnamon stick), any additional fruit, and brandy or alcohol (if using). Add the soda (if using) right before drinking.

- Voila! A traditional Spanish sangria to enjoy with your favorite tapas.


